Spis treści:
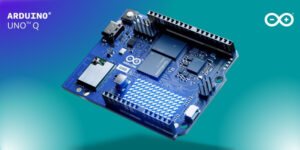
Pomiary parametrów takich jak temperatura, wilgotność i ciśnienie są często podstawą projektów elektronicznych. Nie każdy jednak posiada wiedzę i możliwości aby samodzielnie stworzyć platformę sprzętową, która spełniała by takie funkcje. Dlatego wybór pada na popularne i gotowe rozwiązania, zarówno co do platformy będącej podstawą systemu oraz czujników, które można nabyć w gotowych do użycia modułach. Dziś zobaczycie jak podłączyć czujnik BME688 do Arduino. Używacie na własne ryzyko!
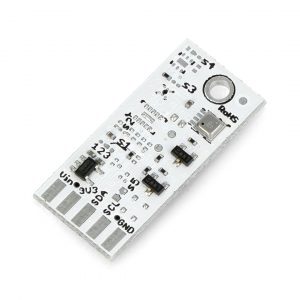
Czujnik BME688
BME688 to czujnik gazu wyposażony w sztuczną inteligencję (AI) oraz zintegrowane czujniki wilgotności i temperatury o wysokiej liniowości i dokładności. Czujnik gazu jest w stanie wykrywać lotne związki organiczne (VOC), lotne związki siarki (VSC) oraz inne gazy, takie jak tlenek węgla (CO) i wodór w zakresie ppb (część na miliard).
Czujnik BME 688 jest wstecznie kompatybilny z BME680. Dodatkowo, oprócz wszystkich cech czujnika BME680, BME688 posiada funkcję pomiaru gazów. W standardowej konfiguracji, obecność lotnych związków siarki może być interpretowana jako np. wskaźnik wzrostu kolonii bakterii. Czujnik można dostosować do własnych potrzeb pod względem czułości, selektywności, szybkości transmisji danych i zużycia energii. Narzędzie o nazwie BME AI-Studio pozwala użytkownikom na zmianę ustawień czujnika gazu BME688 pod kątem konkretnych zastosowań, np. w urządzeniach domowych, produktach IoT lub inteligentnych budynkach.
Główne cechy czujnika BME688:
- Zakres pomiaru temperatury: od -40°C do 85°C
- Zakres pomiaru wilgotności: od 0% do 100%
- Zakres pomiaru ciśnienia: od 300 hPa do 1100 hPa
- Główne wyjścia czujnika gazu (przez BSEC): IAQ, bVOC i ekwiwalent dwutlenku węgla (CO2e) (ppm), rezultat skanu gazu (%) i poziom intensywności
- Dewiacja IAQ (sensor to sensor): +/- 15% / +/- 15 IAQ
- Relatywna dokładność tolerancji / histerezy wilgotności: +/- 3% / ≤ 1,5%
- Dokładność absolutna temperatury: +/- 0,5°C (przy +25°C)
- Błąd pomiarowy ciśnienia: +/- 0,25%
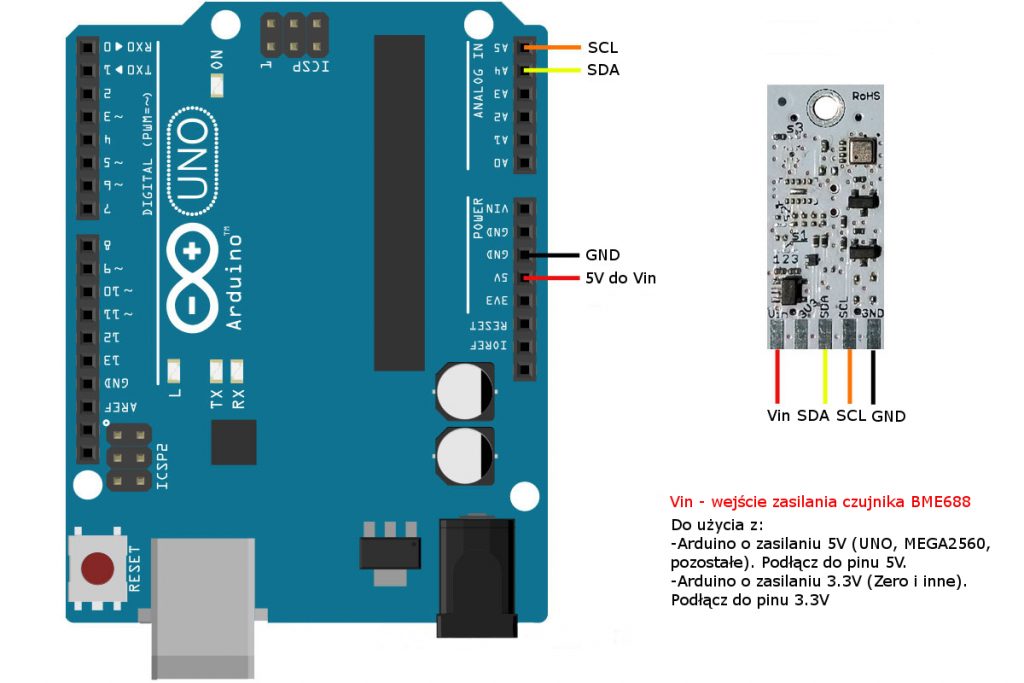
Jak podłączyć BME688 do Arduino?
Przy podłączaniu czujnika BME688 do Arduino ważne jest napięcie platformy sprzętowej. Należy zatem upewnić się jaką wartość napięcia zasilania przyjmuje model, który chcemy użyć do projektu. Czujnik przyjmuje wartości napięcia 3.3V oraz 5V.
W tabeli poniżej znajdziecie informacje jakie wyprowadzenia połączyć ze sobą dla zapewnienia poprawnej pracy głównej płytki w czujnikiem. Zarówno na powierzchni czujnika BME688 jak i na płytce Arduino znajdziecie oznaczenia przy polach lutowniczych lub przelotkach/pinach.
| BME688 | Arduino 5V (np. UNO) | Arduino 3.3V (np. Zero) |
|---|---|---|
| Vin | 5V | 3.3V |
| Vdd (3V3) | nie podłączać | nie podłączać |
| SDA | SDA | SDA |
| SCL | SCL | SCL |
| GND | GND | GND |
Wskazówka podłączenia w przypadku niektórych płytek Arduino:
- SDA (Serial Data) –> A4 na Uno/Pro-Mini, pin 20 w Mega2560/Due, pin 2 Leonardo/Pro-Micro
- SCK (Serial Clock) –> A5 w Uno/Pro-Mini, pin 21 w Mega2560/Due, pin 3 Leonardo/Pro-Micro.
Poniżej, graficzny przykład wykonania połączeń z Arduino UNO:
Część programowa. Jak odczytać dane z czujnika?
Po właściwym podłączeniu poszczególnych linii sygnałowych możemy przystąpić do części programowej. No to nie przedłużając, zacznijmy proces krok po kroku:
- Pobierz bibliotekę BME68x dla swojego Arduino. Możesz to zrobić klikając TUTAJ.
- Rozpakuj bibliotekę i zainstaluj ją w folderze z bibliotekami Arduino. Uruchom Arduino ponownie.
- Utwórz folder o nazwie “ssense_BME688_example”.
Skopiuj poniższy kod, wklej go do nowego pliku i zapisz plik jako “ssense_BME688_example.ino” w folderze utworzonym wcześniej lub pobierz go stąd (użyj polecenia zapisz jako): BME688 – odczyt danych z czujników (kod Arduino)
					/* s-Sense BME68x I2C sensor breakout example - v1.01/20210520.
 *
 * Compatible with:
 *    s-Sense BME688 I2C sensor breakout - gas scanner with AI, air quality sensor, temperature, humidity and pressure sensor - [PN: SS-BME688#I2C, SKU: ITBP-6007,
 *    info https://itbrainpower.net/sensors/BME688
 *    s-Sense BME680 I2C sensor breakout - temperature, humidity, pressure and gas - [PN: SS-BME680#I2C, SKU: ITBP-6003],
 *    info https://itbrainpower.net/sensors/BME680
 *
 * This code shows how to use predefined recommended settings for the BME680 air quality sensor. Read temperature,
 * humidity, pressure and gas sensor data (pulling at 1sec) - code based on based on Zanshin_BME680 library version
 * 1.0.2 / 2019-01-26 - https://github.com/SV-Zanshin . Good job Zanshin!
 *
 * Include three functions for altitude calculation (one provided by Zanshin, one ported from BME280/BMP280 library [NOAA equation] and the
 * last one [based on CASIO equation and implementing temperature compensated algorithm] that was written by us.
 *
 * We've just select the relevant functions, fixed some 328p compiling issues found in original library, add some variables, functions and fuctionalities.
 *
 *
 * Mandatory wiring:
 *    Common for 3.3V and 5V Arduino boards:
 *        sensor I2C SDA  <------> Arduino I2C SDA
 *        sensor I2C SCL  <------> Arduino I2C SCL
 *        sensor GND      <------> Arduino GND
 *    For Arduino 3.3V compatible:
 *        sensor Vin      <------> Arduino 3.3V
 *    For Arduino 5V compatible:
 *        sensor Vin      <------> Arduino 5V
 *
 * Leave other sensor PADS not connected.
 *
 * SPECIAL note for some ARDUINO boards:
 *        SDA (Serial Data)   ->  A4 on Uno/Pro-Mini, 20 on Mega2560/Due, 2 Leonardo/Pro-Micro
 *        SCK (Serial Clock)  ->  A5 on Uno/Pro-Mini, 21 on Mega2560/Due, 3 Leonardo/Pro-Micro
 *
 * WIRING WARNING: wrong wiring may damage your Arduino board MCU or your sensor! Double check what you've done.
 *
 * New BME688/680 sensors requires burn in (48h). Once burned in a sensor requires at least 5 minutes of run in before gas resistance readings are considered good.
 *
 * READ BME688 documentation! https://itbrainpower.net/sensors/BME688
 * READ BME680 documentation! https://itbrainpower.net/sensors/BME680
 *
 * We ask you to use this SOFTWARE only in conjunction with s-Sense BME688 or s-Sense BME680 sensor(s) breakout usage. Modifications, derivates
 * and redistribution of this SOFTWARE must include unmodified this notice. You can redistribute this SOFTWARE and/or modify it under the
 * terms of this notice.
 *
 * This SOFTWARE is distributed is provide "AS IS" in the hope that it will be useful, but WITHOUT ANY WARRANTY; without even the implied warranty of
 * MERCHANTABILITY or FITNESS FOR A PARTICULAR PURPOSE.
 *
 * itbrainpower.net invests significant time and resources providing those how to and in design phase of our IoT products.
 * Support us by purchasing our environmental and air quality sensors from https://itbrainpower.net/order#s-Sense
 *
 *
 * Dragos Iosub, Bucharest 2021.
 * https://itbrainpower.net
 */

 /*! @file I2CDemo.ino


@section I2CDemo_intro_section Description

Example program for using the Bosch BME680 sensor. The sensor measures temperature, pressure and humidity and  is
described at https://www.bosch-sensortec.com/bst/products/all_products/BME680. The datasheet is available from Bosch
at https://ae-bst.resource.bosch.com/media/_tech/media/datasheets/BST-BME680_DS001-11.pdf \n\n

The most recent version of the BME680 library is available at https://github.com/SV-Zanshin/BME680 and the
documentation of the library as well as example programs are described in the project's wiki pages located at
https://github.com/SV-Zanshin/BME680/wiki. \n\n

The BME680 is a very small package so it is unlikely for an Arduino hobbyist to play around with directly, the
hardware used to develop this library is a breakout board from AdaFruit which is well-documented at
https://learn.adafruit.com/adafruit-BME680-humidity-barometric-pressure-temperature-sensor-breakout \n\n

This example program initializes the BME680 to use I2C for communications. The library does not using floating
point mathematics to save on computation space and time, the values for Temperature, Pressure and Humidity are
returned in deci-units, e.g. a Temperature reading of "2731" means "27.31" degrees Celsius. The display in the
example program uses floating point for demonstration purposes only.  Note that the temperature reading is
generally higher than the ambient temperature due to die and PCB temperature and self-heating of the element.\n\n

The pressure reading needs to be adjusted for altitude to get the adjusted pressure reading. There are numerous
sources on the internet for formula converting from standard sea-level pressure to altitude, see the data sheet
for the BME180 on page 16 of http://www.adafruit.com/datasheets/BST-BMP180-DS000-09.pdf. Rather than put a
floating-point function in the library which may not be used but which would use space, an example altitude
computation function has been added to this example program to show how it might be done.

@section I2CDemolicense License

This program is free software: you can redistribute it and/or modify it under the terms of the GNU General
Public License as published by the Free Software Foundation, either version 3 of the License, or (at your
option) any later version. This program is distributed in the hope that it will be useful, but WITHOUT ANY
WARRANTY; without even the implied warranty of MERCHANTABILITY or FITNESS FOR A PARTICULAR PURPOSE.  See the
GNU General Public License for more details. You should have received a copy of the GNU General Public License
along with this program.  If not, see <http://www.gnu.org/licenses/>.

@section I2CDemoauthor Author

Written by Arnd\@SV-Zanshin

@section I2CDemoversions Changelog

Version | Date       | Developer           | Comments
------- | ---------- | ------------------- | --------
1.0.1   | 2019-01-26 | https://github.com/SV-Zanshin | Issue #3 - convert documentation to Doxygen
1.0.0b  | 2018-06-30 | https://github.com/SV-Zanshin | Cloned from original BME280 program

*/

/*******************************************************************************************************************
**                                                                                                                **
** This program is free software: you can redistribute it and/or modify it under the terms of the GNU General     **
** Public License as published by the Free Software Foundation, either version 3 of the License, or (at your      **
** option) any later version. This program is distributed in the hope that it will be useful, but WITHOUT ANY     **
** WARRANTY; without even the implied warranty of MERCHANTABILITY or FITNESS FOR A PARTICULAR PURPOSE.  See the   **
** GNU General Public License for more details. You should have received a copy of the GNU General Public License **
** along with this program.  If not, see <http://www.gnu.org/licenses/>.                                          **
**                                                                                                                **
** Vers.  Date       Developer                     Comments                                                       **
** ====== ========== ============================= ============================================================== **
** 1.0.0b 2018-06-30 https://github.com/SV-Zanshin Cloned from original BME280 program                            **
**                                                                                                                **
*******************************************************************************************************************/
#include "sSense_BME680.h" // Include the BME680 Sensor library
/*******************************************************************************************************************
** Declare all program constants                                                                                  **
*******************************************************************************************************************/

#define SERIAL_SPEED  19200//; ///< Set the baud rate for Serial I/O
/*******************************************************************************************************************
** Declare global variables and instantiate classes                                                               **
*******************************************************************************************************************/
BME680_Class BME680; ///< Create an instance of the BME680

/*!
* @brief     This converts a pressure measurement into a height in meters
* @details   The corrected sea-level pressure can be passed into the function if it is know, otherwise the standard
*            atmospheric pressure of 1013.25hPa is used (see https://en.wikipedia.org/wiki/Atmospheric_pressure
* @param[in] seaLevel Sea-Level pressure in millibars
* @return    floating point altitude in meters.
*/
float altitude(const float seaLevel=1013.25)
{
  /*wikipedia equation - original Zanshin code*/
  static float Altitude;
  int32_t temp, hum, press, gas;
  BME680.getSensorData(temp,hum,press,gas); // Get the most recent values from the device
  Altitude = 44330.0*(1.0-pow(((float)press/100.0)/seaLevel,0.1903)); // Convert into altitude in meters
  return(Altitude);
} // of method altitude()

float calculate_altitude( float pressure, bool metric = true, float seaLevelPressure = 101325)
{
  /*Equations courtesy of NOAA - code ported from BME280*/;
  float altitude = NAN;
  if (!isnan(pressure) && !isnan(seaLevelPressure)){
    altitude = 1000.0 * ( seaLevelPressure - pressure ) / 3386.3752577878;
  }
  return metric ? altitude * 0.3048 : altitude;
}

float temperatureCompensatedAltitude(int32_t pressure, float temp=21.0 /*Celsius*/, float seaLevel=1013.25)
{
  /*Casio equation - code written by itbrainpower.net*/
  float Altitude;
  Altitude = (pow((seaLevel/((float)pressure/100.0)), (1/5.257))-1)*(temp + 273.15) / 0.0065; // Convert into altitude in meters
  return(Altitude);	//this are metric value
}


/*!
    @brief    Arduino method called once at startup to initialize the system
    @details  This is an Arduino IDE method which is called first upon boot or restart. It is only called one time
              and then control goes to the main "loop()" method, from which control never returns
    @return   void
*/
void setup()
{
  DebugPort.begin(SERIAL_SPEED); // Start serial port at Baud rate

  while(!DebugPort) {delay(10);} // Wait

  //delay(1000);

  DebugPort.println("s-Sense BME68x I2C sensor.");
  DebugPort.print("- Initializing BME68x sensor\n");
  while (!BME680.begin(I2C_STANDARD_MODE)) // Start BME68x using I2C protocol
  {
    DebugPort.println("-  Unable to find BME68x. Waiting 1 seconds.");
    delay(1000);
  } // of loop until device is located
  DebugPort.println("- Setting 16x oversampling for all sensors");
  BME680.setOversampling(TemperatureSensor,Oversample16); // Use enumerated type values
  BME680.setOversampling(HumiditySensor,   Oversample16);
  BME680.setOversampling(PressureSensor,   Oversample16);
  DebugPort.println("- Setting IIR filter to a value of 4 samples");
  BME680.setIIRFilter(IIR4);
  DebugPort.println("- Setting gas measurement to 320C for 150ms");
  BME680.setGas(320,150); // 320�c for 150 milliseconds
  DebugPort.println();
} // of method setup()

/*!
    @brief    Arduino method for the main program loop
    @details  This is the main program for the Arduino IDE, it is an infinite loop and keeps on repeating.
    @return   void
*/
void loop()
{
  //static uint8_t loopCounter = 0;
  static int32_t temperature, humidity, pressure, gas;     // Variable to store readings
  BME680.getSensorData(temperature,humidity,pressure,gas); // Get most recent readings
  DebugPort.print("\r\nSensor data >>\t\t");                       // Temperature in deci-degrees
  DebugPort.print(temperature/100.0,2);                       // Temperature in deci-degrees
  DebugPort.print("C\t");
  DebugPort.print(humidity/1000.0,2);                         // Humidity in milli-percent
  DebugPort.print("%\t");
  DebugPort.print(pressure/100.0,2);                          // Pressure in Pascals
  DebugPort.print("hPa\t");
  //DebugPort.print(pressure);                          // Pressure in Pascals
  //DebugPort.print("Pa ");
  DebugPort.print(gas/100.0,2);
  DebugPort.println("mOhm");

  DebugPort.println("\r\nCalculated altitude");

  DebugPort.print("temp comp [CASIO equation]: ");

  //temperatureCompensatedAltitude(int32_t pressure, float temp =21.0, const float seaLevel=1013.25)
  DebugPort.print(temperatureCompensatedAltitude(pressure, temperature/100.0/*, 1022.0*/),2);
  DebugPort.print("m\t");


  DebugPort.print("NOAA equation: ");

  //float calculate_altitude( float pressure, bool metric = true, float seaLevelPressure = 101325)
  DebugPort.print(calculate_altitude((long)pressure,true),2); //calculate_altitude
  //DebugPort.print(calculate_altitude((long)pressure,true, (long)102200.0),2); //calculate_altitude
  DebugPort.print("m\t");

  DebugPort.print("WIKI equation: ");
  DebugPort.print(altitude(),2);
  DebugPort.println("m \r\n");
/*
Temp: 33.03C            Humidity: 42.03% RH             Pressure: 101058.02 Pa
Altitude: 78.84m        Dew point: 12.43C               Equivalent Sea Level Pressure: 101950.37 Pa

Temp: 33.01C            Humidity: 40.75% RH             Pressure: 101051.84 Pa
Altitude: 80.66m        Dew point: 11.71C               Equivalent Sea Level Pressure: 101964.92 Pa

Temp: 32.98C            Humidity: 40.24% RH             Pressure: 101055.34 Pa
Altitude: 79.63m        Dew point: 11.40C               Equivalent Sea Level Pressure: 101956.80 Pa
 */
  delay(1000);
} // of method loop()
4. Ten sam kod jest dostępny w sekcji Arduino “File -> Examples”, w bibliotece “ssense-BME68x”.
5. Skompiluj kod i zaprogramuj Twoje Arduino. Dane z czujnika można zobaczyć na monitorze portu szeregowego Arduino (ustawionym na 19200b/s).
Zaawansowana analiza danych z czujników – obliczanie wysokości. Uwzględniono 3 warianty:
– algorytm podstawowy,
– Algorytm oparty na NOAA (funkcja przeniesiona z biblioteki BME280/BMP280 Arduino),
– implementacja obliczania wysokości CASIO – najdokładniejsze obliczanie wysokości w oparciu o algorytm kompensowany temperaturowo.
Artykuł opublikowany za zgodą: itbrainpower.net
Jak oceniasz ten wpis blogowy?
Kliknij gwiazdkę, aby go ocenić!
Średnia ocena: 5 / 5. Liczba głosów: 5
Jak dotąd brak głosów! Bądź pierwszą osobą, która oceni ten wpis.